Help › Documents
Documents
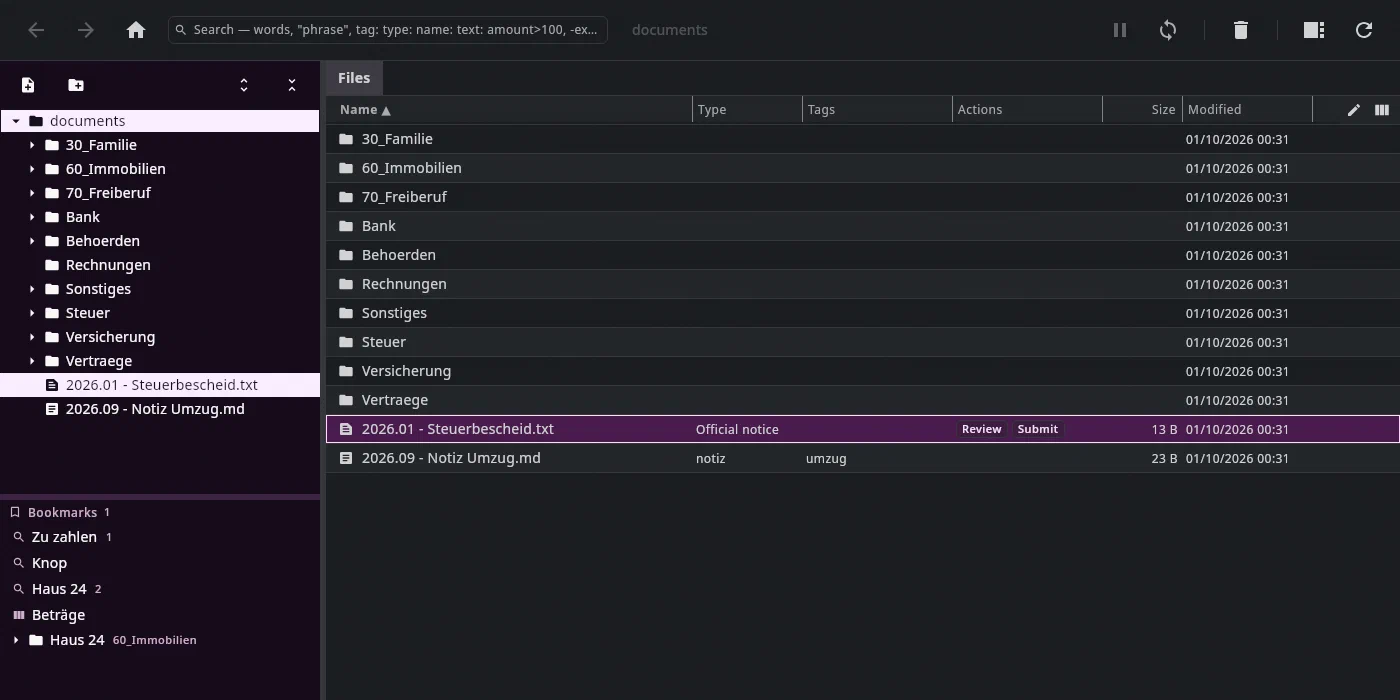
The Documents tab shows the archive: at the top left the rubrics, below them the
folder tree, in the middle the table, on the right the preview, the relations and the fact sheet. The areas
have fixed digits from left to right — Alt+1 rubrics, Alt+2 folders, Alt+3 table,
Alt+4 preview, Alt+5 relations, Alt+6 fact sheet (Keyboard). Each of these
panels collapses via the arrow at the top of its edge into a button on the side rail; the button brings it back. It behaves
like a file manager, and most things need no explanation. This page covers what
is different from what you're used to.
The table#
The middle is one table, with or without a search. Without a search, it shows
the current folder: first its subfolders, then its files — in front of the
name the icon in the colour of the file type (folders gold, PDFs red,
images violet, spreadsheets green, texts blue, notes light green), then with type,
tags and open actions from the facts, size and modification date from the
disk. Return or double-click enters a folder or opens a file,
←/Backspace goes up one level (Alt+↑ from anywhere in the tab), a letter filters. With a search, it shows
the hits (see The search).
- Selecting several rows — as in any file manager, in the folder as in the
search:
Shift+↓/Shift+↑extends the selection from the row where it began,Shift+End/Shift+Homeup to the edge,Ctrl+Atakes every row of the table;Ctrl+↓/Ctrl+↑moves only the cursor,Spaceadds or removes the row under it. With the mouse:Ctrl+click adds or removes a row,Shift+click selects the range up to the row, a plain click selects one.Escreduces several to the one under the cursor, anotherEscto none. From two selected rows on, "3 selected" is shown below the table — and dragging a selected row takes all of them along, for instance into an upload in the browser (see Dragging). - Columns: the column icon on the right of the header row (or a right-click on it) opens the column picker — checkboxes on or off; drag the displayed ones up or down by their name. The handle between two headers drags the width. Clicking a header sorts (twice: descending, three times: off); folders always come first. At the bottom of the column picker: Save as bookmark… — the columns together with folder, sort order and search as one line in the bookmarks.
- Actions: the Actions column shows for each row what still needs doing —
a small chip for each open action (Pay, Bookkeep, …). Clicking
the chip writes nothing; it opens a menu: Done today, Date…,
Not needed; only the choice writes, as one step that
Ctrl+Zundoes. If several rows are selected, the choice applies to all of them (the number is in the entry).Alt+Returnopens the same menu for the row under the cursor,Esccloses it without writing anything. It is as wide as its longest entry and sits below the chip. - Edit (
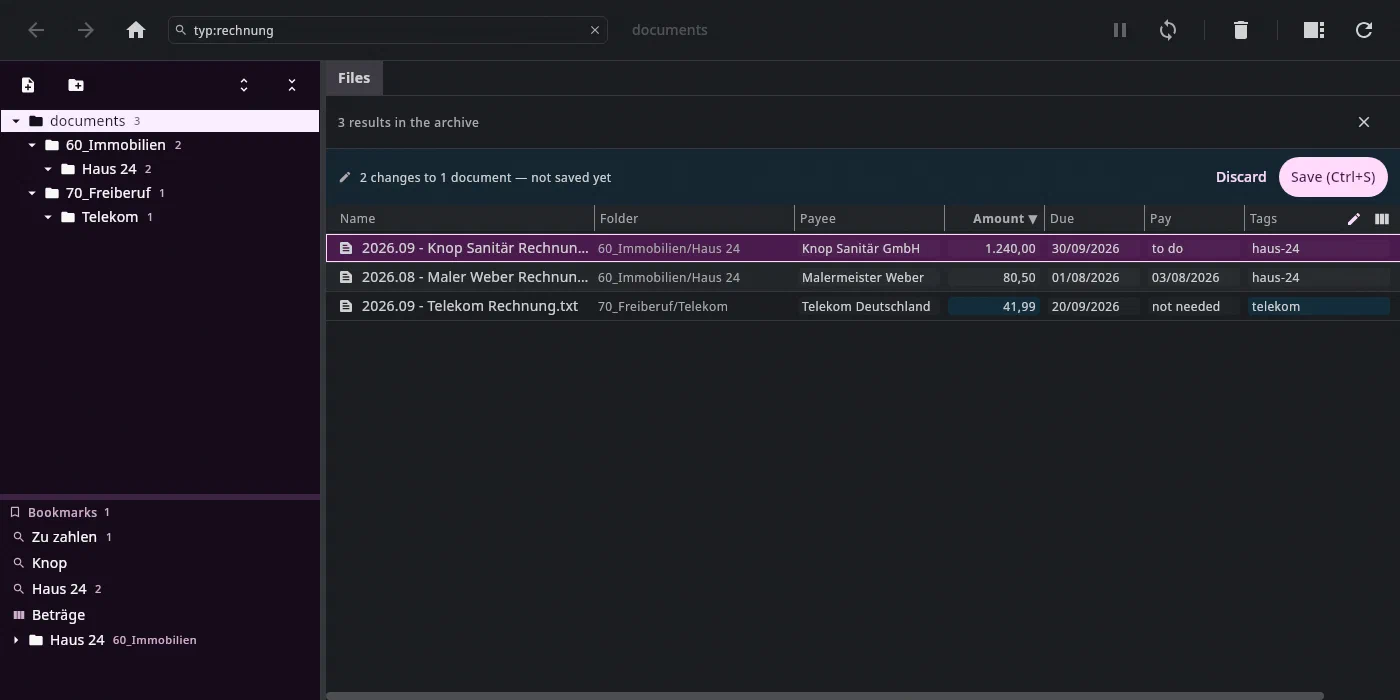
Ctrl+Eor the pencil in the header row): change the facts in the cells — type, tags, fields, actions; name and folder stay with the context menu. Clicking a cell opens it; you type amounts and dates in German format (1.240,00,30.09.2026), they are saved normalized; below them are suggestions — candidates from the document's text, the types, the tags from your archive (most frequent first), the states of an action. As you type, the list filters; in the tags cell it applies to the word at the cursor (haus-24, ste→steuer), tags already set aren't in it.↓(freshly openedAlt+↓) goes into the list,↑/↓choose,Returnaccepts,Escfirst closes the list, then the cell. A date cell has a calendar icon on the right: it opens (likeAlt+↓) a month sheet next to the cell —←/→one day,↑/↓one week,PgUp/PgDnone month,Returnaccepts,Escgoes back into the field. Without a mouse:Returnon a row opens its first cell. In the editor,Returnaccepts,Escdiscards the cell,Tabgoes to the next column (at the end of the row into the next row),←/→to the neighboring column (as soon as the cursor is at the edge of the text — so right after opening immediately; in the middle of a word they move the cursor),↑/↓to the same column of the neighboring row — that's how you type down a column; the table scrolls along. Right-click on a cell: set for the selection (one value for all selected rows — type, payee, a tag) and derive from the text (each selected row gets its amount, its date, its IBAN from its own text; only empty fields, without a model). Changes are tinted and not yet written:Ctrl+Ssaves everything as one step into the fact journal — oneCtrl+Zundoes the whole session.Escleaves the mode; if there are changes, it asks. This is the way to capture a fresh set of files: open the folder, select all, set the type, amounts from the text, save.
The tree also shows files#
The top row is your archive and is called Documents — in the tree, in the path above it, in the bookmarks and in every dialog that names a folder, whatever the folder is called on disk.
Under each expanded folder, first its subfolders appear, then its files — with the same icon per file type as in the list, in the same colour. Clicking a file in the tree selects it in the list and shows it in the preview; conversely, what is selected in the list is also selected in the tree. There is one selection, not two. A double-click opens the file, the context menu offers the same as in the list. Type-to-filter in the tree still filters only folders; for files there is the search.
With the keyboard: → on a file shows it in the “Documents” tab and in
the preview, the focus stays in the tree — that's how you quickly leaf through
documents and notes without opening anything. Return goes to the file: a
note into its editor tab, everything else into the file list.
Long names are shortened in the middle so that date and ending stay readable; on hover the full name is shown, and the row the cursor is on shows it in full. The “New note” and “New folder” buttons above the tree create in the folder that is selected in the tree.
The workspace#
Two things that are easily taken for one:
| What | Affects | |
|---|---|---|
| Current folder | where you are | the file list |
| Workspace | the section you are working in | search, tree, “Reindex” |
Normally the workspace is the whole archive. Narrowing it only happens explicitly: double-click or Set as workspace in the context menu. As long as it is narrower than the archive, a banner below the address bar names it and leads out in one click. Mere navigation never changes it.
The search#
Ctrl+F takes you to the search field. The search covers the whole archive:
file names, full text and facts. Punctuation is kept: 466,54 finds
the amount, 2024.05 the files of that month.
As soon as there is something in the field, the tab is filtered — all three columns at once:
- The tree shows only folders that contain hits, each with its
count. The root row means all; clicking a folder below it
shows only the hits in it and its subfolders.
Backspacein the table leads back to all. - The middle is the same table: one row per hit,
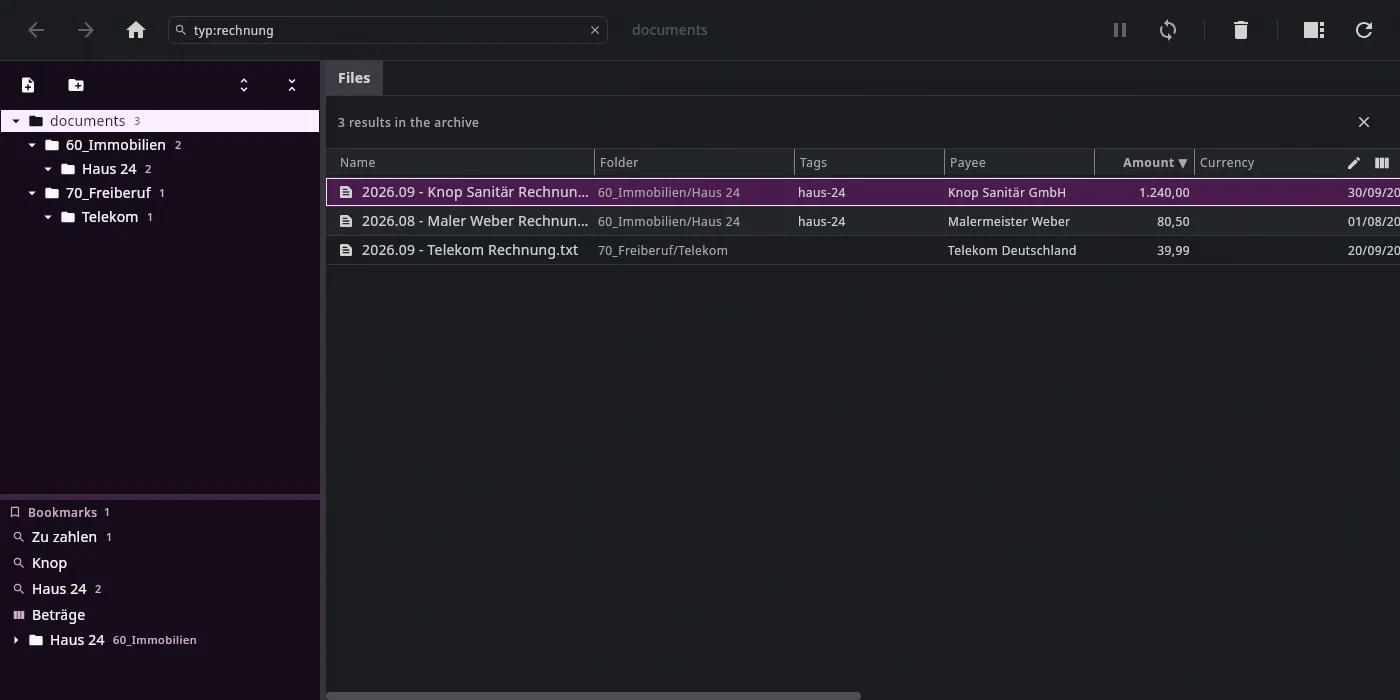
columns from the vocabulary. Which columns, the search works out from the input
— if
type:invoiceis in it, they are the invoice's fields; otherwise name, folder, type, tags, actions. Money sorts as a number, dates as dates. If the table is wider than the window, it scrolls sideways. Ctrl+Aselects all hits,Shift+↓,Ctrl- andShift-click work as in the file list (see The table) — and the selection can be dragged out of the table, into a folder in the tree or into another program (all medical invoices into the health insurer's upload).- If the input searches for text, each row carries the excerpt with the
highlighted hit below it, and hits in the name and the folder are highlighted
too. If it only searches for facts (
type:invoice $pay:open), each row stays single-line. - The preview on the right follows the click as in the file list; in the
Facts tab you stamp an action.
Returnon a hit selects its folder in the tree. If a note editor is in the middle, it stays and the table appears above it, with a splitter.
Esc in the search field, the ✕ above the table or an empty field end the
search; the last selected folder stays.
The search field speaks a small language. Everything you write side by side must match:
| Input | finds |
|---|---|
telekom rechnung | both words, anywhere in name, folder or text |
"zweite Mahnung" | exactly these words in this order |
name:vertrag | only in the file name (text: only in the content, path: only in the path) |
tag:open or #open | everything with this tag |
type:invoice | by type (area:… only if your vocabulary still has areas — new archives have none) |
payee:telekom | a field contains the text |
amount>100, due<today+7 | comparisons — money as a number, dates as dates |
missing:type | the field is missing |
-entwurf, -tag:open | a minus in front negates |
tag:open or tag:nachhaken | one of the two (or, oder, ||); everything without or between it must match together |
German works too. The search keys are English because bookmarks and
queries are stored that way; when typed, the German ones still work — typ:,
bereich:, pfad:, titel:, inhalt:, ohne:, oder, heute —, and you may
call fields, types and actions by their name: typ:rechnung,
betrag>100, faellig<heute+7, bezahlen:offen search the same as the rows above.
tag:open on its own is also a search — this is how you see all files with a tag;
$pay:open all invoices that are still to be paid (bezahlen:offen
or Bezahlen:offen works too).
While you type, the field makes suggestions: from the second letter on, the keys
(Tab accepts), after the colon the values from your vocabulary
(↑/↓ choose, Tab or Return accepts). A value the vocabulary
doesn't know is reported in red above the hits.
Emails are searched in their parts. Of an .eml, the subject,
sender, recipients, date and the whole conversation are in the index — including the
quoted older messages and the signatures with their phone numbers.
Of the attachments, name, type and size are there, so that you can find an email
by the name of its attachment; the attachment's content is searched
as soon as it is in the archive as a document of its own. Whether something is an email is decided by
its content, not its extension.
Saved searches#
Ctrl+B in the search field saves the search under a name — including folder,
columns and sort order: a search that is saved in the folder Haus 24
shows only this subtree again when you call it up. It appears in the
bookmarks with a magnifying glass; if it only searches for facts, its
hit count is next to it, always up to date. A click restores everything;
right-click renames or removes.
This replaces the former views (ansichten.md): a view was a
query with columns and buttons — the query is now the search field, the
columns are the table, and stamping happens in the fact sheet of the preview.
Preview#
The third column shows the selected file: PDFs and images rendered, text files directly, Markdown typeset. The header row has the buttons for OCR text, the separate window and — for text — the reading width; the arrow on the right collapses the preview:
- OCR text (for text files Index text) — the text as search and model see it, in place of the document; the same button leads back. Index now catches up on what's missing.
- Print — the printer button in the header row,
Ctrl+Por Print… in the table's right-click menu, for PDFs and notes. A note is typeset for this: title, properties, checkboxes (tasks round, checklists square), phases and deadlines as dates, images — in Helvetica. If it is open and changed, what is in the editor is printed. Save as PDF… in the right-click menu stores the same sheet as a file. The dialog offers copies, pages (1,3,5-7), two-sided on the long or short edge, color or black and white, paper size and portrait or landscape. Only what your printer can really do is offered — it is asked. Below the pages field it shows how many pages will come out. - The facts bar below it names type, payee, amount, deadline, what needs
doing and the tags; the pencil on the right (or
Alt+6) expands the fact sheet — fields, notes, GiroCode, next to the document or below it. See Facts.
Word, OpenDocument and Excel (.docx, .doc, .odt, .rtf, .xlsx,
.xls, .ods) show up as pages, the way they would print — with
paging, zoom and the hits of your search. Undan brings a part of
LibreOffice for this; you don't need to install anything. The first time
it takes a second or two for the pages to appear — until then the file's
text is shown, with a quiet line above it. After that the pages are
remembered until the file changes. A spreadsheet that would be very long as
pages (over 200) is shown as text. Search finds the text of these files
too, old .doc and .xls included; a Word or Excel attachment of a mail
opens in the preview on the right as well.
With a button, the preview can be undocked into a separate window (second screen), and with the splitter it can be dragged as wide as you like.
The typeset preview is clickable. A document path — in backticks, as a
- Evidence: line or inserted by dragging — shows the file with one click and
selects it in tree and list; a right-click offers Open in Documents. A
link from note to note opens the other note, [[Name]] too — the
name may be the title, the file name or an alias from the note's header. A
link to an email (mid:) opens it in the Mail tab. A
checkbox with an ID (🆔) toggles the task. What can't be
resolved stays plain text instead of being a dead link.
A double-click on an embedded image opens it in full size in
its own window; Esc closes it again. In the preview,
images stay scaled down to the column width.
Relations#
To the right of the preview you see what the selected file is connected to — for a document
the notes that mention it, the tasks it is attached to as evidence, the emails it came with, the
contacts and the events; for a note also which notes link to it. The second line of each entry
says why it is there. Alt+5 jumps here and expands the column. For a document the header has
Note on this document: it is created in the document's folder, with its path in it, and opens in the
Notes tab — the same entry is in the context menu.
- evidence for “…” — an evidence line under a statement names the document, with the page if it is given.
- mentioned in the text — the path is in backticks in a note.
- attached as evidence — the task lists the document among its evidence.
- attachment with the same checksum — an email carries the same content as an attachment; came with this email — the document was filed from it.
- same IBAN, same VAT ID — from the document's facts and the contact's fields.
- probably: same name — only the name matches; such entries are in italics and come after the certain ones.
- via the task “…” — the event belongs to a task that has the document as evidence.
A section without entries is a single line ("Events · none"), and anything that points nowhere stays there struck through. A click opens the entry where it opens anyway: the note in the editor, the task on its page, the email in the Mail tab, the contact in Contacts, the event in the Calendar. The arrow at the top right collapses the column to a narrow strip that shows the number of relations; a click on the strip brings it back.
Nothing is guessed: emails are found only through the checksum of an attachment or the Message-ID, events only from the calendar's cache — no network.
Context menu#
One menu for tree, table and search — with one rule: if the row is part of a selection of several, the entry affects the whole selection and states the number. Tags are set in the table's edit mode.
| Entry | What |
|---|---|
| Open | in the default program |
Rename (F2), Move to…, Copy to… | via the target folder dialog with a list of suggestions — F2 works in the folder as in the search hits. Next to the field Browse … (Ctrl+Shift+D): the file picker with the folder tree and the folder's contents; Return goes in, Ctrl+Return takes the Target shown at the bottom. If the folder does not exist yet: New folder at the top right (Ctrl+Shift+N) creates it where you are — it then is the target. “Documents” itself is a target too (the field then shows .). You can drag the dialog larger and smaller at its edges, and the borders between tree, list and contents as well as the one between rubrics and tree; a double click restores the default |
Delete (Delete) | into the trash, never permanently — also in the search hits |
| Copy, Cut, Paste | the application's clipboard (Ctrl+C/X/V) |
| Show in folder | only during a search: the hit's folder is selected in the tree, the search stays |
| Assign task / Assign task (n) | attach the files as documents to an existing task (the default, chosen in the tree area → project → task) or create a new one — Tasks |
| Edit… | put text, a date or a signature on a PDF — Editing PDFs |
| Create as Word document | for a PDF: an editable Word document next to it — without AI, the PDF stays (below) |
| Attach to AI chat | the selection as an attachment of the next question — AI chat |
| Reindex / Re-read (force) | discard the stored text or repeat the OCR |
Bookmark (Ctrl+B) | the folder or file into the bookmarks |
Copy to… deliberately creates a duplicate: for papers that you collect in a submission folder but that should still stay in their place. An occupied target is an error; nothing is ever overwritten.
Create as Word document turns a PDF into a Word document of the same name
next to it (Rechnung.pdf → Rechnung.docx; if that exists, Rechnung (Word).docx).
Undan computes headings, paragraphs, lists, tables, columns, header and footer
and a letter with its address field back from where the words stand; the images
come from the PDF; a scan becomes similar, not the same. It runs in the background,
the bar at the top says when it is done; then the Word document is selected.
Ctrl+Z takes it away again. It has no key — you find it in the command palette
(Ctrl+K) as well, and you can assign one in the settings. With changes on the
way: through the AI chat.
Dragging#
Files and folders can be moved by dragging in the tree and in the list
— and out of the application, for instance into a mail window as an attachment or
into a web page's upload. If the row you drag lies in a selection of several, all of
them come along; pressing with Ctrl or Shift starts no drag, that is selecting. When
dragging out, nothing is ever deleted, whatever the target program negotiates.
The application accepts nothing dragged in from outside; that's what the Inbox is for.
A drag is one step: all moves together, one Ctrl+Z brings them
back. Occupied names are skipped and counted.
Trash and undo#
Deleted items are in the trash (button with count in the toolbar), for as long as set under Settings → Retention (default 30 days), with origin, size, time and restore for each row. The period applies to all computers of this archive; the trash and its tooltip name it.
Every file operation — rename, move, delete, create folder,
set facts, edit PDF, an applied chat proposal — is in the
journal. Ctrl+Z undoes the last one, even after a restart. A
run with many moves is one entry: one Ctrl+Z brings back the whole run.
PDF preview: page by page with the arrows, or continuous — the button with the stacked pages next to the page number switches, and the setting applies to all previews, also after a restart. In continuous mode, “Page x / y” shows the topmost page in view; the arrows then jump on page by page. With the middle mouse button you grab the sheet: hold it and drag, the page follows the pointer in every direction. The left button still drags a rectangle whose text goes to the clipboard.
Zoom: the magnifiers next to the percentage and, with the keyboard in
the sheet, + and − jump from step to step between 50 and 300 %. Ctrl
- mouse wheel goes finer (a tenth per notch), and whatever is under the
pointer stays where it is. When the number is not at 100 %, it is itself a
button back to 100 %, as is the
0key. Each file remembers its zoom while Undan is running. While a new size is being drawn, the page briefly stands blurred at its new size.
Fit to width: the button to the right of the magnifiers, Shift+0 in
the sheet or the command palette (Ctrl+K, “width”) makes the page
fill the width of the column — and follow it when you drag the column
border, open or close a side bar or make the window bigger. The button
applies to all previews and stays on after a restart. When you zoom
yourself (magnifier, key, wheel), it switches off and the page keeps that
size; one click switches it on again. In the file picker, what you switch
there applies only there. Very large pages (A3, long receipts) are drawn at
most as big as an A4 page at 300 %.
Writing notes#
Double-click or Return on a note opens it in the Notes tab — there it is in
its folder, without tabs, and saved when you leave it; a single click shows it here in the preview.
Above the file list there is still a tab strip for the transition: Files is the list, next to
it notes that are still open here, and text files; New note above the tree or in the
context menu creates one and opens it right away. A .txt, .csv,
.log or .json also opens in the editor this way — as plain text, without
coloring and without widgets; everything else still opens the default program.
Arranging and closing tabs. You drag a tab to its
new place — it follows the pointer, the others move out of the way, and on
release it glides there; with the keyboard Ctrl+Shift+PgUp / PgDn,
where the two tabs also glide to their new places.
Files always stays at the front and can be neither dragged nor closed.
Ctrl+W closes the open tab — wherever the keyboard happens to be,
in the tree, in the list or in the preview. Right-clicking a
tab offers Close, Close others and Close all, on
Files only Close all. A tab with unsaved text does not close
this way: it stays open, and the top says which ones stayed open —
if you close it on its own, it asks as always. The order is
remembered and is the same again after a restart.
Many tabs. If they don't all fit in the strip, the active one is in the
middle, with as many tabs on its left as on its right. What doesn't fit lies as a
stack at its side: a narrow edge for each hidden tab, the number next to it.
With Ctrl+PgUp / PgDn or a click on a tab at the
edge, the window moves on — on one side a tab goes into the
stack, on the other one flips out. A click on a stack
opens the list of all open notes: typing filters, ↑ ↓ and
Return jump, Esc closes; the hidden ones are marked “left” or
“right”, ● means unsaved, the cross closes the tab.
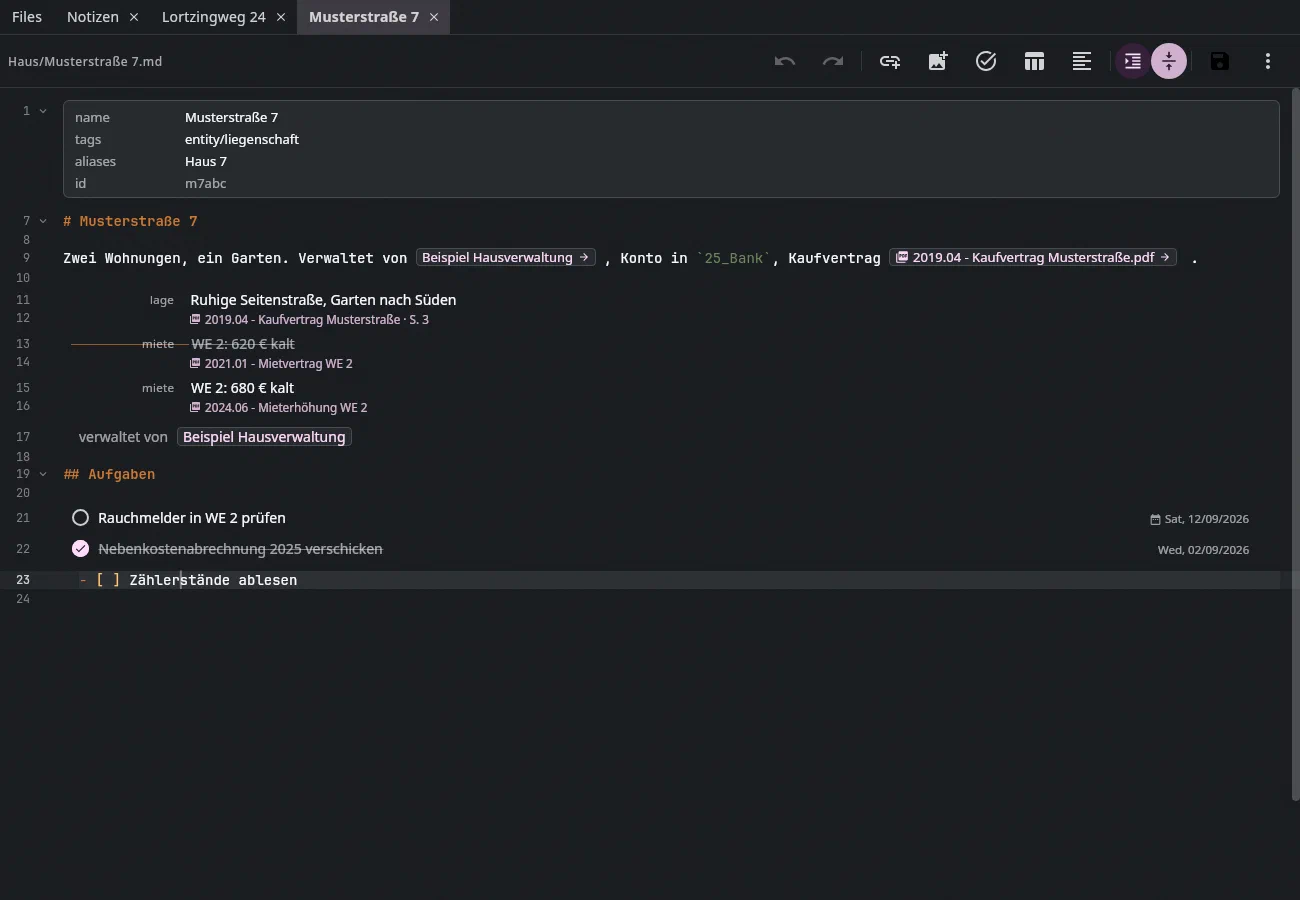
The editor shows the source text — colored: headings, links, code, properties and the marks of a task line each have their own color, as you know from a programming editor. Nothing is hidden; every character of the file is still there. What the application knows — tasks, statements, tables, the frontmatter, links — has appeared as a widget since stage 3, until the cursor enters it; see “Widgets in the editor” below. You see the note typeset in the preview on the right as soon as the note is selected there — it then shows every keystroke and scrolls to the spot where you are typing; the switch with the two arrows in the bar turns this off. It also works the other way round: as long as the switch is on, a click on ordinary text in the preview puts the cursor in the source at the word you clicked — also in bold text, in a table cell, in the title or in the note of a task —, and the editor then has the keyboard: you read on the right, click on the typo and correct it on the left without looking for the spot. The preview stays still. If the click lands beside the text (on a bullet, in the date line under a task), the cursor goes to the start of the block. If the preview is in a separate window, only the cursor gets the spot; the keyboard stays where it is. A click on a link, a checkbox or an image keeps its own effect; text selected in the preview is not selected in the editor as well. If you select a different document on the right, that document appears next to the note that describes it.
In the bar: undo and redo, insert link, insert image,
make a task, insert table, format, reading width,
preview follows the editor, save, a three-dot menu
(Show in tree — Alt+F1, selects the open note in the folder tree and gives it the keyboard; Note structure, Source only — each with a checkmark; last
Move to trash … — Ctrl+Shift+Delete), Open in separate
window. Each button explains itself on hover.
There is a way back for emergencies, without a button: since stage 2,
the editor draws the source itself, and input runs through an
invisible field — should umlauts, dead keys or pasting not
arrive, Ctrl+Alt+Shift+T switches to the text field from before (and
back again).
Move to trash … first asks if the note has unsaved changes: Save (the version goes into the trash as well), Discard or Cancel — the text is never silently lost with the tab. If there are tasks in the note (a project or area note), it asks, as in the Tasks tab, what happens to them (see Tasks); otherwise the usual question Delete? comes. The tasks' Inbox doesn't offer the entry.
| Key | Effect |
|---|---|
Ctrl+Z / Ctrl+Y | undo and redo typing, as finely as you are used to |
Ctrl+S | save. The previous version is kept; Ctrl+Z in the file list brings it back, for as long as set under Retention (default 30 days) |
Ctrl+F | search in this note; pressed again, in the whole archive, a third time back in the note — see “Searching in the note” below |
Ctrl+K | insert a link: a note as [[Name]], a document as a path, an email as [Betreff](mid:…) — from two letters on, the dialog also searches the subject and sender of your emails (rows with an envelope icon). All of them are clickable in the preview |
Ctrl+Shift+T | make a task from the line under the cursor |
Ctrl+B / Ctrl+I | make the selection bold / italic (again: marks removed). In the editor, Ctrl+B takes precedence over the bookmark |
Ctrl+U / Ctrl+Shift+X | ++underline++ / |
Ctrl+Alt+H | Highlight: mark the selection with ==…==, in the color chosen last (again: removed). The colors are in the context menu under Format → Highlight: yellow ==Text==, otherwise with a color sign after it — ==🟢Text== green, 🟠 orange, 🔴 red, 🔵 blue, 🟣 purple, as in Obsidian and Bear |
Alt+F1 | Show in tree: the tree expands up to the open note, selects it and gets the keyboard |
Ctrl+Shift+Delete | the open note into the trash — with the questions about unsaved changes and about its tasks; Ctrl+Z brings everything back |
Alt+7 | show and hide the note's structure next to the source — see “The structure of a note” below |
Ctrl+R | search and replace in this note — see “Search and replace” below |
Ctrl+Shift+F | format: align tables in the source |
Return | in a list item: the next item (in a numbered list, the items below are renumbered); on an empty item: the list ends. In a quote (> ): the next line starts with > again; on an empty >: the quote ends, with a blank line, and you write on below it — a callout (> [!note]) continues the same way. At the end of a table row: a new row with empty cells. Otherwise the new line starts with the indentation of the old one |
Shift+Return | a new line below the cursor line, wherever the cursor is — the text to the right of the cursor stays where it is. In a list the next item, in a quote a line with > , in a table the next row |
Shift+F10 | the context menu at the cursor — see “The context menu” below |
Tab / Shift+Tab | in a list item: indent / outdent, with everything below it. In a table: the next / previous cell, selected — typing replaces it. In the last cell, a new row |
Ctrl+V | paste with detection — see “Pasting” below |
Ctrl+Shift+V | paste unchanged |
Ctrl+W | close the tab (or window), asking first if there is unsaved text — in the whole Documents tab, not just in the editor |
Ctrl+Tab | to the next tab |
Ctrl+PgUp / PgDn | to the previous / next tab, Files included — as in Chrome |
Ctrl+Shift+PgUp / PgDn | move the open tab one place to the left / right |
Lists#
A list is written as in any notes app: - and the text,
then Return — the next item is already there, with the same marker. With
1., 2. comes the next number, with a checkbox - [ ] a new,
empty checkbox, even if the previous one was ticked. If the item is empty and
you press Return again, the marker disappears: the list is
over, and you continue with normal text. Tab turns the item into a
sub-item, Shift+Tab brings it back — and if there are already
sub-items below the item, they move along. This also works for several items at
once: select them, then Tab. Shift+Return creates the next item,
even if the cursor is in the middle of the text — the text stays where it is; a
Return on the new, empty item ends the list as usual.
Numbered lists count themselves. If you insert an item in the middle
with Return, indent one with Tab, delete one
or paste several lines, the numbers are right again afterwards — the first number of the list stays
as it is, and an indented item starts its sub-list at 1. Another
list further down in the note stays untouched.
The indentation carries over. Outside a list too, after
Return the new line starts indented as far as the old one. A second
Return on the then empty line jumps back to the start of the line — so
you write indented paragraphs without counting spaces.
Lists are slightly indented in the editor, and if a long item wraps, the next line continues under its text, not under the dash. Between two real lines — and two list items — there is slightly more space than between the lines of a wrapped paragraph; not in code and tables; sub-items sit closer together than items. Bold and italic appear without their asterisks as long as the cursor isn't in the word — when it goes in, they appear for editing. You set font and size under Settings → Appearance. The end of a note can be scrolled up to the middle of the window, so you don't have to look at the bottom edge while writing on. A ticked task is struck through — also as a sub-item, in a numbered list and when the cursor is in the line.
Moving sections#
A section is a heading with everything below it — up to the next heading of the same or a higher level. Sub-sections, paragraphs and tasks belong to it. You move it as a whole, just like a task card:
- With the keyboard:
Alt+Shift+↑moves the section the cursor is in above the previous one of the same level,Alt+Shift+↓below the next one. If the cursor is in a sub-section, the sub-section moves — within its section. If the section is already at the top or bottom, a hint says so. - With the mouse: when the pointer is anywhere in a heading's line — or to
its left at the same height — a handle appears in front of the line (six
dots, as on a task; in the Tasks tab on the section band). It stays until you
reach it, and under the pointer it turns into a hand. As soon as you press,
the whole section is highlighted — a quiet background with a bar on the
left — so you can see what comes along. Drag: a card follows the pointer with
the title, "n lines · m tasks" and the destination; a line with a label
("before “Beta”", "to the end") shows where it will land. The target is the
nearest boundary between sections of the same level — the upper half of a
section means "before", the lower half "after"; you don't have to hit a
heading. Where nothing can happen (its own place), the card says "not here".
At the top or bottom edge the note scrolls along.
Esccancels the drag; a click on the handle without dragging only places the cursor. - In the context menu on a heading (or right-click on the handle) and in the
structure (
Alt+7, two arrows at every heading) it works the same way.
One drag is one Ctrl+Z. Afterwards exactly one blank line separates two
sections. Tasks in the section keep their ID; on save, the journal learns which
heading they now sit under — in the Tasks tab they appear in that section. A #
inside a code block is not a heading; the title heading at the very top has
nothing to swap with and stays where it is.
The gutter: line numbers, folding, bookmarks#
Headings (# … ######) are set in their size — # larger than ## —, bold and
with the # visible; when the cursor is in one, the gutter quietly shows its level
(“H2”) instead of its number. In “Source only” everything is the same size.
To the left of the text there is a gutter as in IntelliJ: for each line of the file its number; the line with the cursor is slightly highlighted and its number brighter. Where a widget covers several lines (the header as a panel, a table), the number of its first line is shown; a folded task shows the number of its title. A click on a number selects the whole line.
Folding. Headings (up to the next one of the same level), list items
with indented sub-items, code blocks and the header can be
folded: next to the number there is an arrow ⌄, and a click folds. When folded,
the arrow › is there, and below the header line a placeholder “… 12 lines” —
a click on it (or on the arrow) unfolds again. With the keyboard:
Alt+Return (or Ctrl+.) folds what surrounds the cursor, and on a
folded header unfolds it again — only in a task card does Alt+Return open
the card as usual. On a heading only its own section folds;
if there is nothing below it yet (a heading you just typed), nothing happens
— the section above doesn't fold instead. Alt+Shift+Return folds everything, and if
something is already folded, unfolds everything (Ctrl+Shift+− / Ctrl+Shift++ work too). The cursor never disappears into
a fold: if it is inside one, it goes to the end of the header line, and if it
later jumps inside (search, bookmark), the fold opens. Each tab remembers what is folded
as long as it is open.
Bookmarks on lines. Ctrl+Shift+1 sets bookmark 1 on the line
with the cursor — a small 1 then appears in the gutter; pressing
Ctrl+Shift+1 again on the same line removes it, on another line
moves it there. There are ten, 0 to 9. Ctrl+1 jumps there, also into
another note: it opens as a tab, the cursor is at the start of the line,
and the keyboard is in the editor — even if it was in the tree or the
list before. A bookmark moves with its line when lines above it
are added or removed, and follows when the note is renamed or
moved. It only applies on this computer (not in the archive, not
synced). If it points to a file that no longer exists, the
jump says so, and the bookmark stays.
“Gutter with line numbers and folding” in the editor's three-dot menu turns the gutter on and off. A project note as a page has no gutter (under “Source only” it does), and neither does the phone.
A note in a separate window#
The last button in the bar — or a right-click on the note's tab
— opens it in a separate window. You can drag it to a
second screen and find it with Alt+Tab while the application
shows the chat, the Inbox or the tasks.
It is the same note, just somewhere else: the same text, the same undo, the same draft. That's why it is not at the same time in the tab strip — otherwise you would have the same text in two places with two cursors. The middle then shows the note to the left of it, otherwise the file list. If you open the note again (double-click, a link), its window comes to the front.
The window has its own preview on the right, with a splitter; it follows
the cursor like the one in the Documents tab. Ctrl+F searches in the note as usual,
Ctrl+S saves, Ctrl+W closes.
Dock — the button on the far right of the window — brings it back into the tab strip. The window's close button, on the other hand, closes the note; if you have unsaved text, you are asked first.
Two things the window can't do, because they don't work across window boundaries:
dragging a file from tree or list into the source (use
Ctrl+K) and Search the whole archive from the note search — the
search field for that is in the path bar of the Documents tab.
The program remembers which notes are in windows, where these are and how big they are until the next start — for each note. If a window was on a screen that is missing at startup, the program brings it onto one that exists.
Searching in the note#
Ctrl+F searches where the keyboard currently is. If it is in the source,
a bar opens above the text and searches in this note — with
five thousand words, the question you really have. If it is in the tree, in the
file list, in the hits or in the bookmarks, Ctrl+F jumps into the search field at the top as
usual and searches the whole archive. You can see which area is currently
active by the frame around it.
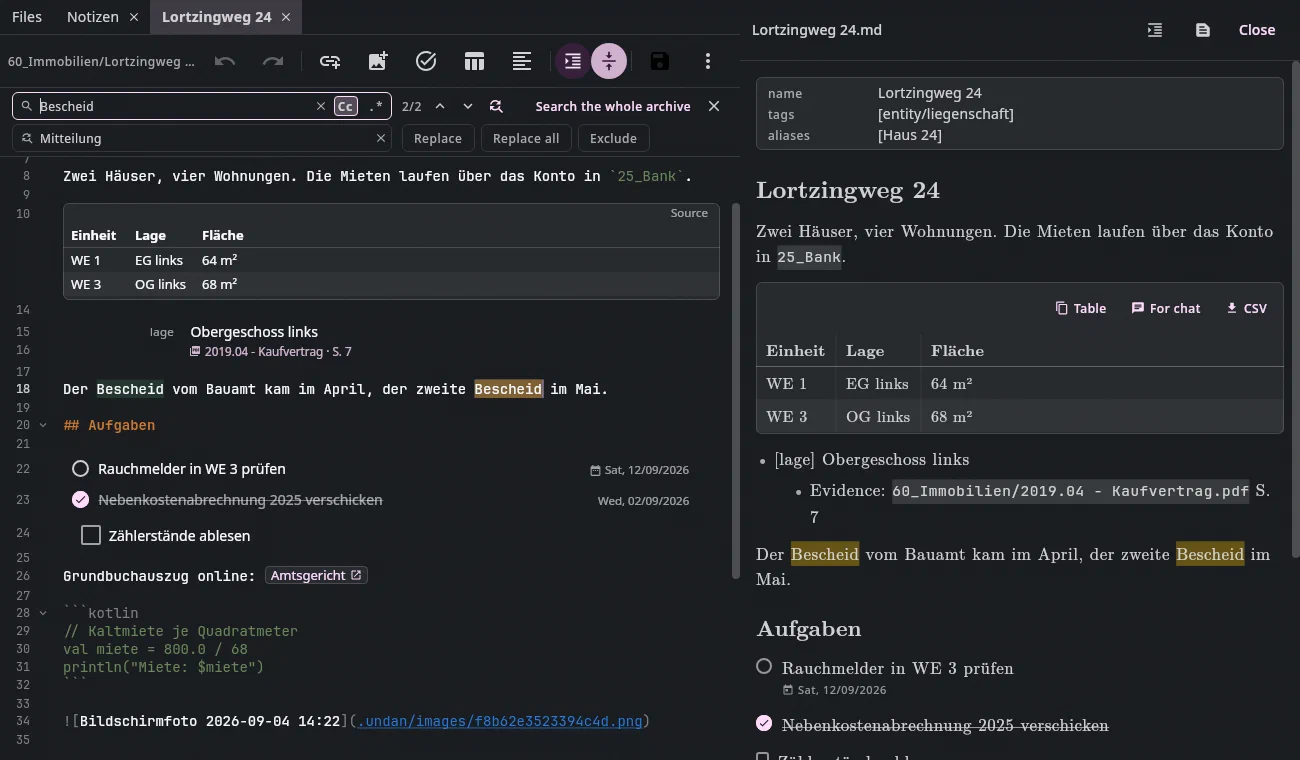
In the bar: ↑ and ↓ (or Return) go from match to
match, next to them it says “3 / 17”, and the match is highlighted in the text. If
the preview on the right shows the same note, it highlights the same term. Esc
first clears the text and then closes the bar.
If you realize along the way that you actually wanted to search the whole archive,
press Ctrl+F again: the term moves into the search field at the top
and the keyboard follows; you don't have to type it again.
A third Ctrl+F brings you back into the note. The same path is
a button in the bar (Search the whole archive), for the mouse.
Search and replace#
Ctrl+R opens the same bar with a second row Replace with.
If something is selected in the text, it becomes the search term. On the right of the search field there are
two switches: Cc — match case (Alt+C) — and .*
— the term is a regular expression (Alt+X); then ^/$ apply per line,
and in the replacement $1 gets the first group ((\d+)-(\d+)-(\d+) → $3.$2.$1
turns 2026-09-22 into 22.09.2026).
- Replace (
Returnin the replace field) replaces the selected match and jumps to the next one; if none is selected, the first press only jumps there. - Replace all (
Ctrl+Return) replaces every match at once — oneCtrl+Zundoes it all. - Exclude skips the selected match for “Replace all”; the count says how many are excluded. If you then type in the text, the exclusion no longer applies.
Tab switches from the search field to the replace field, Shift+Tab back, ↑/↓
go through the matches in both. Esc closes the whole bar.
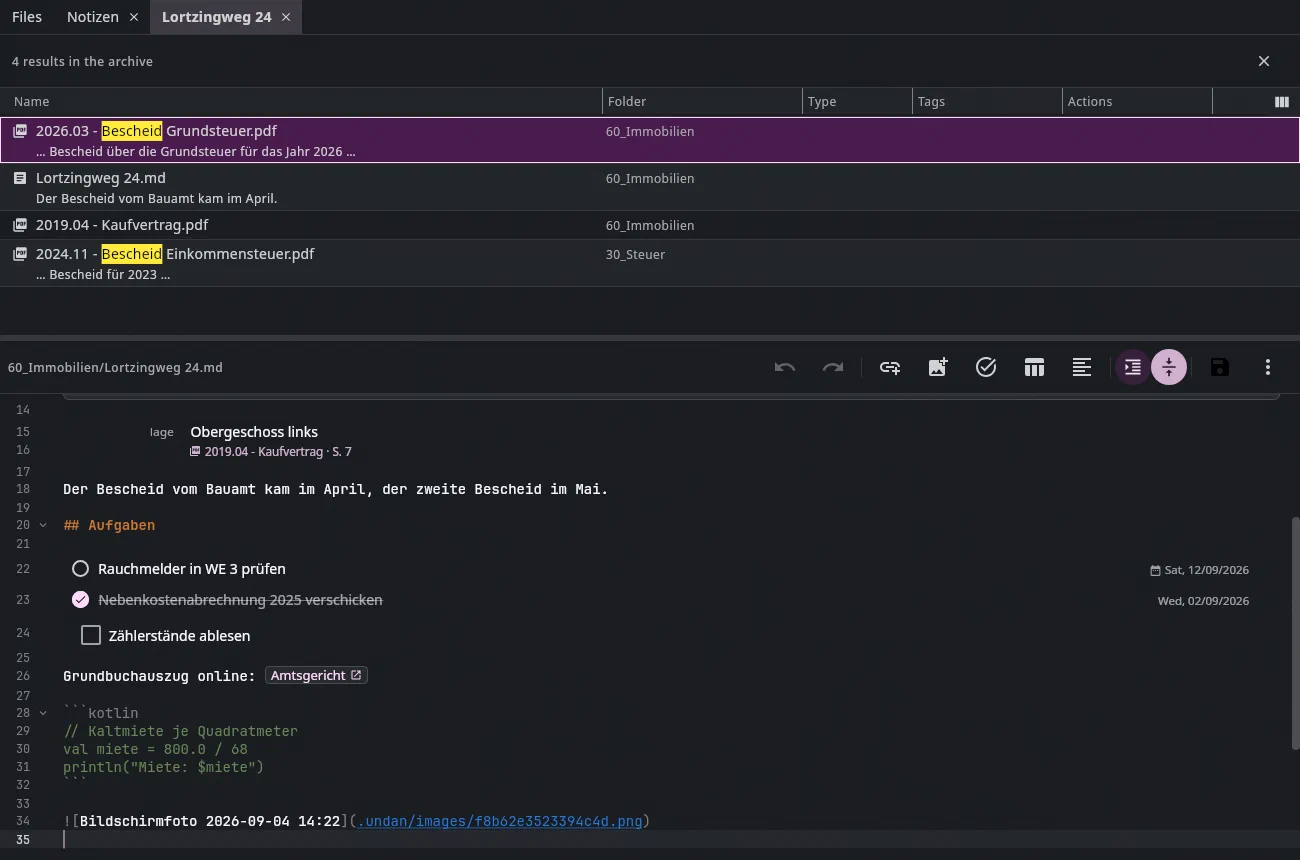
And the other way round: the results list of the archive search now also appears above the editor when a note is open. You go through the hits, the preview on the right shows the hit, it is selected in the tree — and the note stays open below.
Reading width#
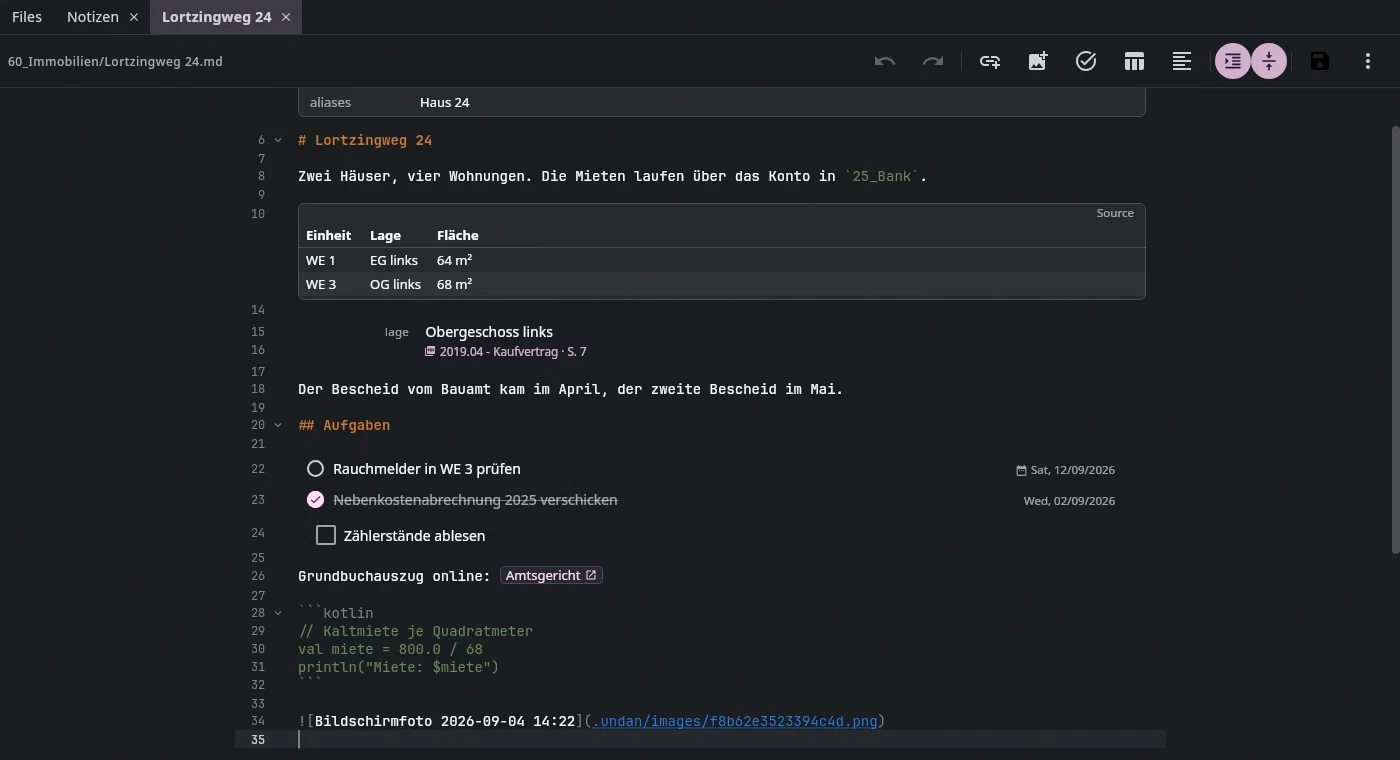
The button with the indented lines sets the source to reading width:
instead of spanning the whole column, it is centered in a column that is as wide
as the text in the AI chat. On a wide screen, lines otherwise get so
long that the eye loses the line when jumping back. Clicking again
restores full width; the setting applies to all notes and
is kept at the next start. It also applies in the preview — there
with a button of its own in the header row and wide enough that a line holds about
66 characters, as in a LaTeX document. Images are centered in the preview,
with {.left} or {.right} after the image on the left or right.
Tables are created with the table button: a skeleton with a header row,
separator row and one empty row, with the first header cell selected. Then
Tab from cell to cell, Return for the next row. “Format”
aligns the pipes when the cells have become different lengths.
Inserting, moving, duplicating, deleting and
aligning rows and columns, and sorting the table, works through the right mouse button — see
“The context menu”.
Links by dragging: dragging a file or folder from the tree or the
file list onto the source inserts the link at the cursor position
— the same as Ctrl+K, just with the mouse. In a separate window this doesn't
work; there Ctrl+K is the way.
Code blocks: type three backticks at the start of a line, and the
closing fence appears immediately on the next line — the cursor stays after the
first three, where the language name goes. In the typeset
view, a code block with a language name (```java) is
colored, a web address has a small ↗, and the properties of a
note (the block between --- at the very top) appear as a box above the text.
Pasting: Ctrl+V looks at what is on the clipboard before it
goes into the text, and the strip below the bar says what was recognized.
A table from a spreadsheet or from a log
(tab-separated, also with semicolon or comma) becomes a Markdown table,
aligned as after “Format”. What comes from the browser becomes
Markdown: headings, lists, links, bold and italic, tables. A
path from the archive becomes a link, a note becomes [[Name]] — several
at once too, for instance after Ctrl+C in the file list. A web address
on selected text turns it into a link to the address. JSON and
log lines go into a code block, bullet lists from Word or an
email (•, 1)) become Markdown lists. An image file from the file manager
is embedded and keeps its name as description. Only what is
unambiguous is recognized; ordinary text goes in unchanged. If you don't want the
detection, press Ctrl+Shift+V — or Ctrl+Z right after.
How fast: pasting happens in the background — the editor stays usable,
and if it takes longer than a quarter of a second, the strip says “Reading
clipboard …” and afterwards how long it took. Under Wayland,
the application reads the clipboard with wl-paste if it is installed
(package wl-clipboard); it works without it too, but more slowly with large images.
Images: Ctrl+V in the source pastes a screenshot from the clipboard.
The image button in the bar offers both ways: Image from
clipboard — this also takes an image file you
copied in the file manager — and Image from file …, which opens your
system's file dialog. The file may be anywhere, even outside the
archive; it is copied in. You see it in the
typeset view and in the preview; the file itself lies invisibly in the
archive and doesn't appear in any folder. If the note no longer needs the image
— you deleted the line and saved —, it moves to the
trash; Ctrl+Z in the file list brings back note and image together.
An image that is already in the archive you drag from the file list onto the
source: it is embedded, not copied.
A dot on the tab means “unsaved”. Every few seconds the
application stores a draft; after a crash, the text is back at the next
start, with a notice. Save when leaving: under
Settings → Retention you can turn on that a note is
saved as soon as you leave it — another tab (for instance
Tasks, which then shows the new task lines right away), another
note tab, another window, quitting. Each such save is
a version as with Ctrl+S, and Ctrl+Z brings back the previous one; at the top of the
bar it briefly says what was saved. A file that is missing or has been changed from outside
is never saved automatically. If the file has changed in the meantime —
for instance via sync from another computer —, the notice is red:
saving would overwrite the other version. If the file is renamed or moved,
the tab follows. If it is changed or deleted outside the application, a
strip in the editor says so instead of anything being overwritten.
If the file has been deleted from outside — by another program, via
sync —, the text is only left in the tab. Save (or Recreate
in the red strip) then writes the file with this text to its
old place; Ctrl+Z undoes that as long as it is unchanged. If you close the
tab, you are asked first, even without a change of your own: afterwards
the text would be gone. If you delete a note in the application, on the other hand,
its tab closes along with it — the file is in the trash.
The help itself can't be edited; it belongs to the application.
Widgets in the editor#
Since stage 3 of the editor tree, the editor no longer shows every line as source. What the application knows appears as what it is:
- a task line (with ID
🆔) as a task card — a round checkbox to click, the title, the date small on the right; done is struck through. A checkbox line without an ID stays a square checkbox; - a statement of a knowledge note with its category on the left in front of it and its documents below it as links — a click on a document shows the document on the right;
- the frontmatter as a properties panel — a click on a value turns
it into a field,
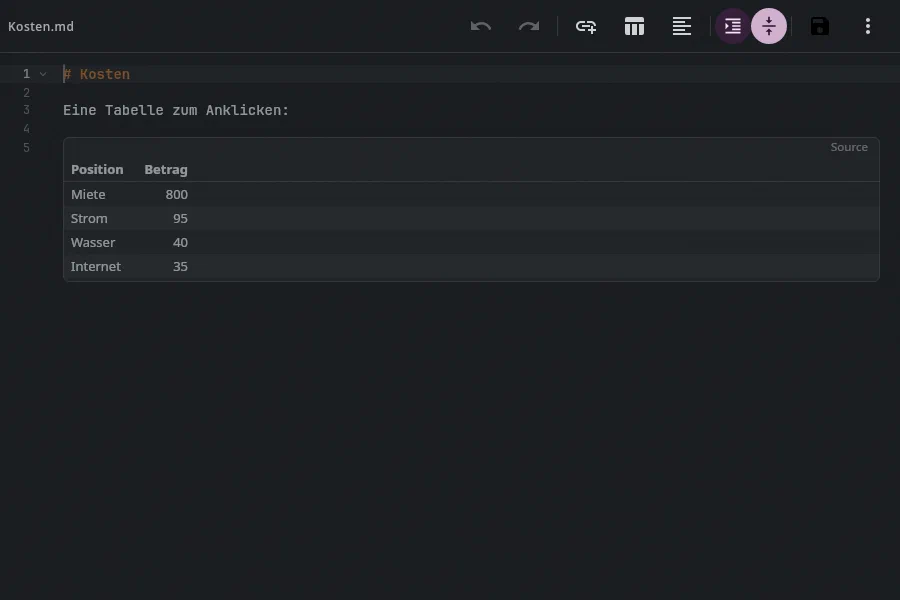
Returnwrites,Escdiscards (theid:stays read-only); - a table as a grid, every second row slightly set off — a click
into a cell puts the cursor exactly there, and the table appears as
source;
Tabgoes to the next cell, “Source” at the top right puts the cursor into the first one; - a horizontal rule (
---) as a line; - an image on its own line as an image, centered (with
{.left}/{.right}on the left or right) — only if it is turned on under Settings → Appearance, always in the Text view; a click on it selects it (size, caption,Delete— see “Notes”, “Images”); - the header of a message in a correspondence note as a line with sender, “→ recipient” and date;
- inline:
[[Verweise]], document paths,[Titel](Adresse)and bare web addresses as chips. At the end there is a sign that says where the link leads: → into the archive, the box with an arrow outside. A click on → shows the target in the preview (a note too, without opening it as a tab), a click on the box opens the address in the browser. - a link to an email,
[Betreff](mid:…)— that's how Copy link in an email's ⋮ puts it on the clipboard, and that's howCtrl+Kinserts it when you choose an email in the dialog — as a chip with an envelope icon, sender and subject; → opens the email in the Mail tab, even if it has since moved to another folder or account. If the mailbox doesn't know it, the application searches for it in your accounts (the chip is pale in the meantime); if it doesn't find it, the chip stays struck through. In the preview, a click on the link opens the email; Obsidian shows the subject as text.
The rule behind it is Obsidian's: where the cursor is, you see
the source. A click into a widget puts the cursor inside, and the
line appears as Markdown — slightly set off, so you can see that this is
source right now; when the cursor moves on (↑, ↓, a click elsewhere),
it becomes a widget again. The exception is the task card: it stays
a card, even with the cursor in the title — what else is in its line (- [ ],
📅, 🆔) only Source only shows (see
The task card). A click on a chip puts the cursor into
the link; Ctrl+click opens it — the note as a tab, the
document in the preview, the email in the Mail tab. ←/→ jump over a chip as if it
were one character. What a widget changes — the checkbox, a value, a cell —
is a change in the text, undoable with Ctrl+Z like any typing.
Source only in the bar's three-dot menu turns off all widgets: every line as it is in the file. For those who want to read Markdown, and for when a widget is in the way. The setting is kept at the next start.
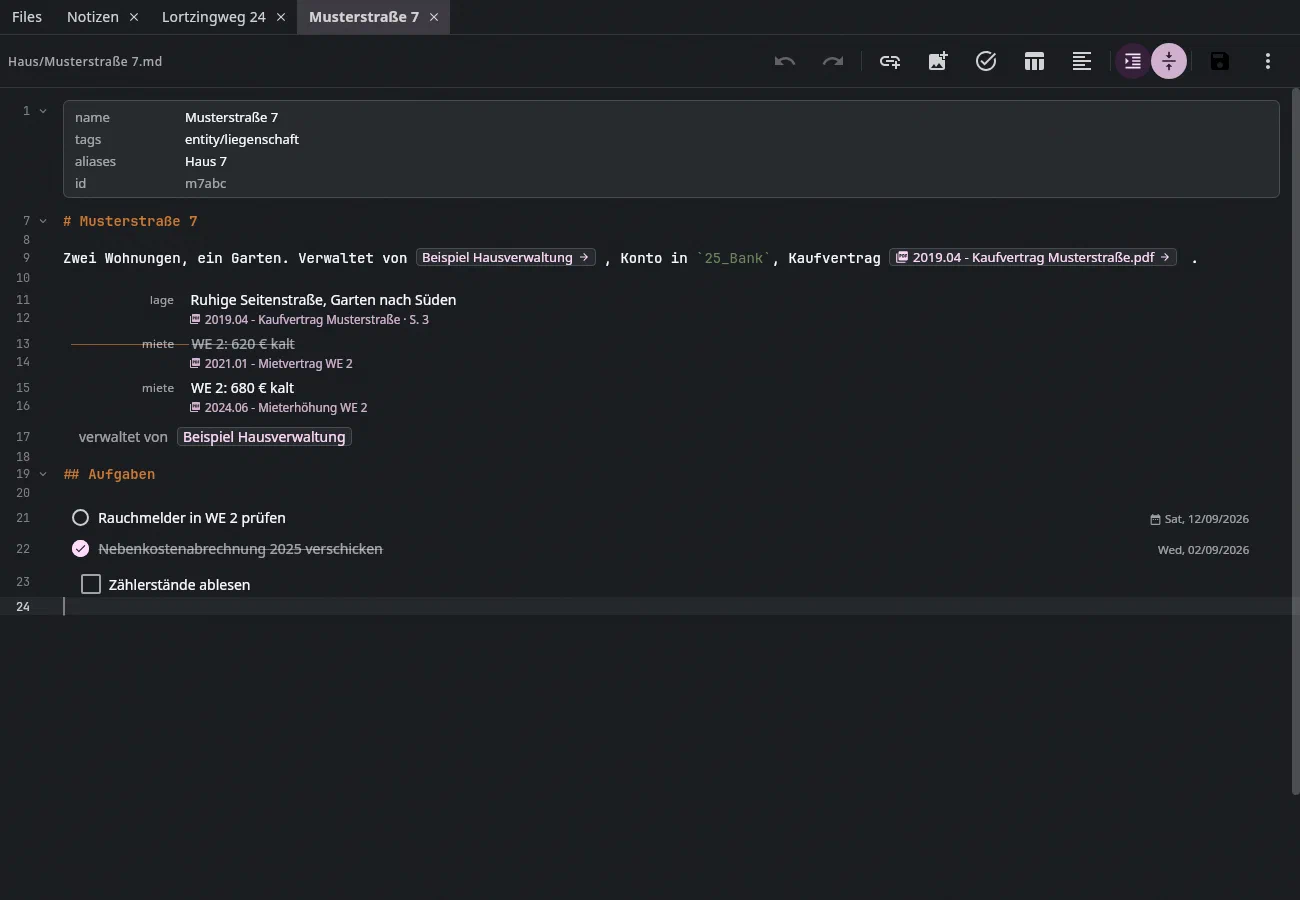
You edit statements in place. The sentence of a statement is text of the note — you type into it without the picture changing. If the cursor is in the sentence, the statement is open — what is below it moves down a little, nothing is covered:
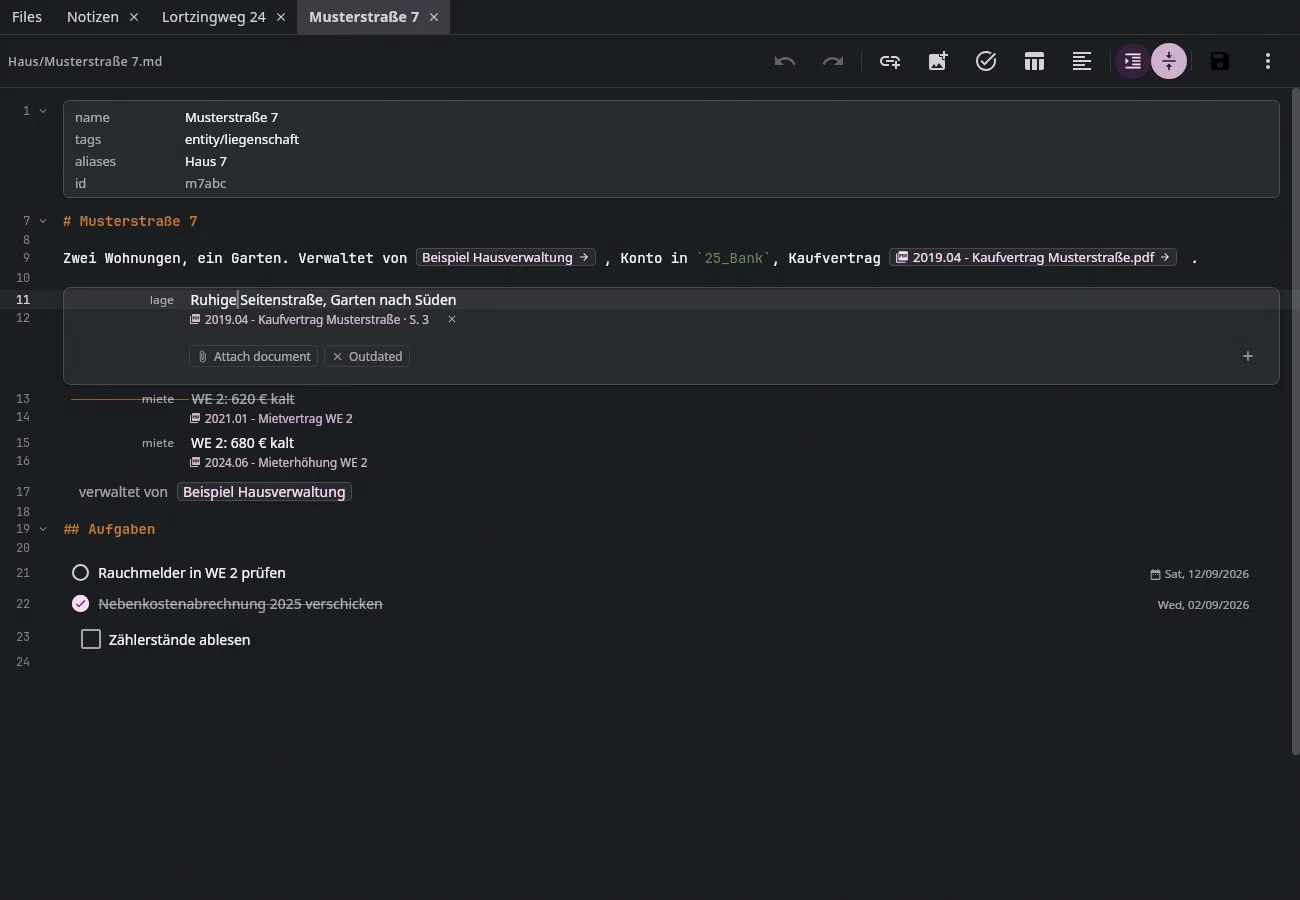
- a click on the category on the left opens its selection (the note's categories, or a new one);
- Attach document chooses a document from the archive, the
×on a document removes it again; - Outdated strikes through the statement without deleting it;
Returnin the sentence (or the plus on the right) gives the next statement of the same category, an empty sentence ends the collecting;- the first statement of a note: right-click → Paragraph → Statement turns the line into one.
The context menu#
The right mouse button in the editor — or Shift+F10 at the cursor — opens a
menu modeled on Obsidian:
- Insert link (like
Ctrl+K) and Insert web link —[Titel](https://), on selected text with that text as the title; - Format: bold, italic, code — chosen again, it removes the marks again;
- Paragraph: bulleted list, numbered list, task list, heading 1 to 6, quote, body text — for all selected lines;
- Insert: table, horizontal rule, code block;
- Cut, Copy, Paste, Paste as text, Select all.
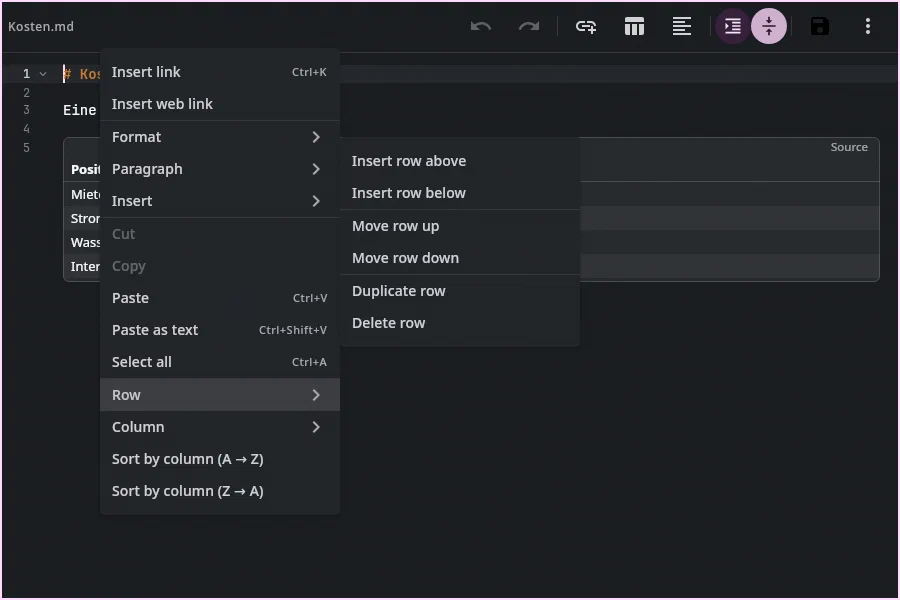
If the pointer is in a table, there are also Row (insert before or
after, move up or down, duplicate, delete), Column
(insert, move left or right, align left, center or right,
duplicate, delete) and Sort by column, ascending or
descending. What's meant is the cell under the pointer — the table doesn't have to be
shown as source first. Numbers are sorted as numbers
(9 before 10, also 1.234,56 €), a date like 15.09.2026 as a date,
empty cells go to the end; the header row stays at the top. What doesn't work
is grayed out: deleting the header row, moving the first row up.
Every entry is a change in the text, undoable with Ctrl+Z, and
the table is aligned afterwards.
Spelling#
A word that no dictionary knows gets a red wavy underline — shortly after
you stop typing; the word you are typing only once a space follows it. The
right mouse button on it (or Shift+F10 with the cursor in it) shows the
suggestions at the top of the context menu — a click replaces the word,
Ctrl+Z takes it back —, and also:
- Add “…” to the dictionary — the word counts from now on, on every
computer: it is in the archive in
.undan/dictionary.md, one word per line. You can edit the file yourself too (Settings → Appearance → Spelling → Open in editor). Entered in lower case, a word also counts capitalised at the start of a sentence. - Ignore — not marked again until the next start.
What gets checked is the text, not the syntax: never code, link targets,
web addresses, email addresses, the front matter, #tags, the IDs of tasks;
no abbreviations like GmbH or IBAN, no words next to digits or in file
names. The check knows the names of your contacts by itself. German,
English and Swedish count at the same time — a word is right if one of the
dictionaries knows it; Grüße and Grüsse both work.
Undan ships no dictionary (the German ones are under the GPL). It takes
those of the computer — on Linux the package hunspell-en-us (and
hunspell-de, hunspell-sv) — or the .dic and .aff files you put into
~/.undan/dictionaries/ yourself (for example from LibreOffice's
dictionaries). Which ones count, and the switch, are under Settings →
Appearance → Spelling. Notes (Markdown) and the mail draft are checked.
The structure of a note#
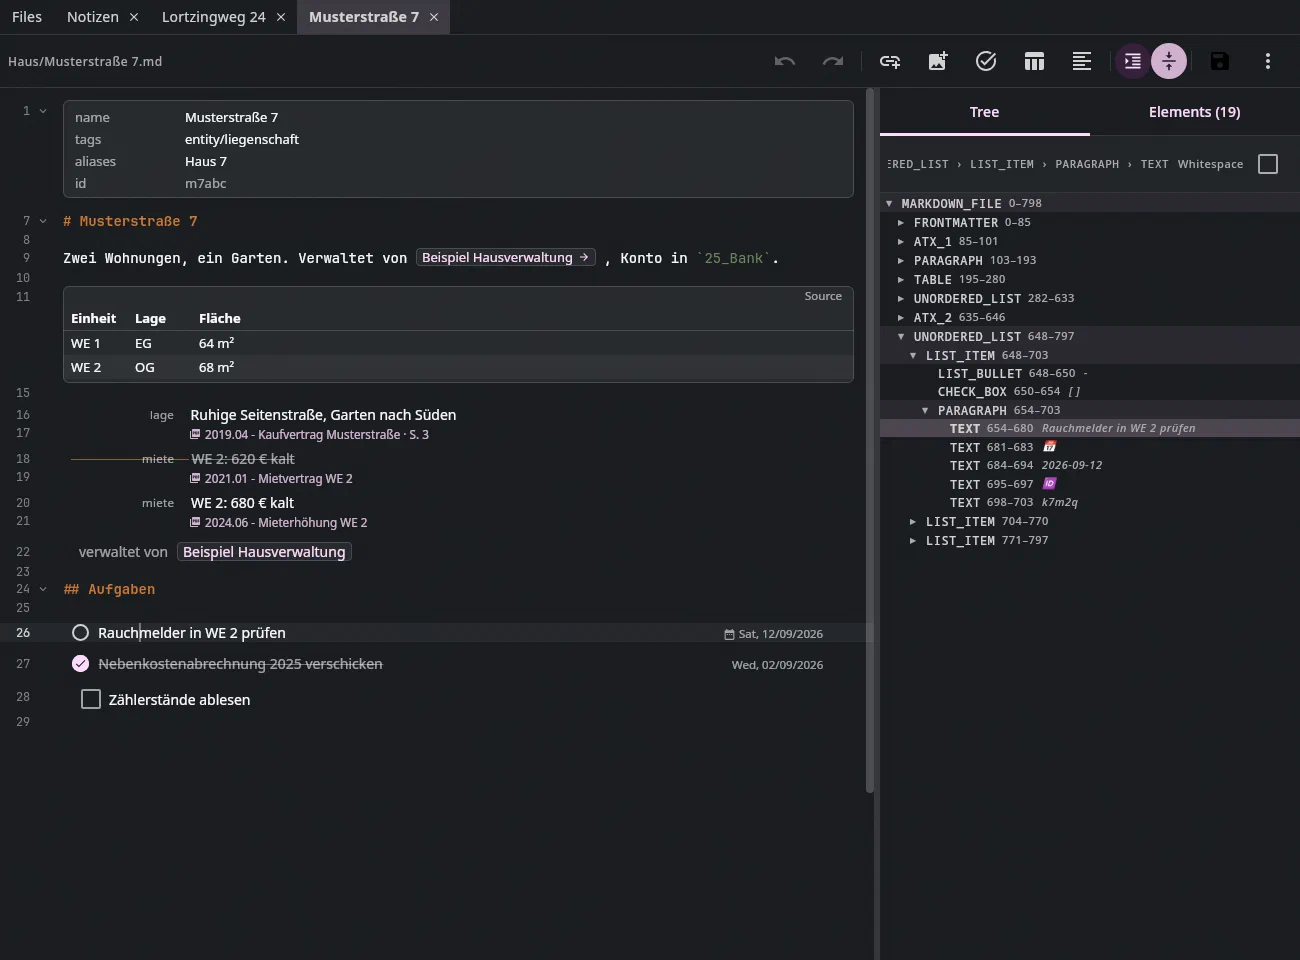
“Note structure” in the bar's three-dot menu — or Alt+7 — opens
the note's structure to the right of the source: how the application reads the text.
Two tabs: Tree shows every building block with its kind and its range in the
text (heading, paragraph, list, list item, table, code block, for
small blocks the start of the text), Elements lists what the
application recognizes in it — task lines with their ID, statements and
documents of a knowledge note, messages of a correspondence note,
[[Verweise]], document paths, the properties at the top between the ---.
A click on a row selects the range in the source; conversely, the cursor in the source highlights its path through the tree, and the strip above the view names it. This way you can see, for example, why a line isn't a task (it lacks the ID) or whether a document really is indented under its statement. The “Whitespace” switch also shows line breaks and spaces — they are building blocks like all the others. The setting applies to all notes and is kept at the next start.
Merging two notes#
Two notes mean the same thing — the project note and a second one that
came about on the side. Right-click the note that is to be merged into the other,
Merge…: it is the source. If exactly two notes are selected,
the other one is preset as the target (the button next to it swaps the roles);
otherwise you type the target into a field with suggestions from all notes of the
archive — or choose it via Browse … (Ctrl+Shift+D) in the file picker: it
then shows notes only, with a preview; the source is listed there as "Source"
and cannot be taken.
What happens then: the text of the source goes below that of the target, with a
horizontal rule and a line “Merged on … from “…””; the properties
at the top (tags, aliases, participants of a mail conversation) are combined, and
the source's title and file name become aliases of the target — so [[Quelle]] in
other notes still finds its way, without any other note being touched.
If a single value of the source contradicts that of the target (for instance a different
end:), the target's value stays, and the source's value is in the text below the
origin line. The source goes to the trash.
Everything attached to the source stays reachable: its facts (type, tags,
fields) are now seen by the target; a task's document that pointed to the source
leads to the target; task lines with 🆔 move along and get
no new ID. The target keeps its own ID.
No merge happens as long as one of the two notes is open in the editor and
unsaved — the dialog says so and disables the button. Ctrl+Z in the
file list undoes everything together: the target is as it was before, the
source is back, and its facts belong to it again.
The AI chat can propose the same thing (section “Merge notes” in the proposal card).
Rubrics#
Above the tree, in three parts — every rubric is a query in the search language; a click puts it into the search field, and the table shows the hits in the whole archive (see The search):
- Open actions —
$pay:openis called Pay, with the number of files that carry it open; only actions that exist right now. - Types — from the vocabulary, by their count; a type with fewer than three files sits behind More.
- Own views and Pinned — the bookmarks, see below.
The border between rubrics and tree can be dragged, or moved with ↑/↓ when it has the keyboard; a
double-click resets it.
Bookmarks#
Below the rubrics, as Own views (searches and column views) and Pinned (places). A bookmark is a place — a folder, a file or the whole archive — and can also carry a search, columns and a sort order. Three kinds are in one list:
- Places (folders and files) expand like the tree above; a file
is a jump target — a click (or
Return) opens a note in its editor tab, everything else is selected in the table.Ctrl+Bsets or removes one, on whatever you are pointing at: the cursor in the tree, the one selected row of the table, otherwise the current folder. In the editorCtrl+Bis bold — there it goes via the file's context menu. - Searches (magnifying glass) — see Saved searches.
- Column views (table icon): a folder with fixed columns and sort order, saved via Save as bookmark… in the column picker. That way there can be three bookmarks on the root with three different column sets. A click sets folder, columns and sort order.
Right-click a bookmark: rename (a name of your own instead of the
folder name; leaving it empty restores the folder name) or remove.
The bookmarks are in the archive (.undan/bookmarks.md, one
line per entry) and are therefore there on every computer that opens the same archive;
the file can also be changed by hand (Ctrl+S on it takes effect
immediately):
- `60_Immobilien/Haus 24`
- `60_Immobilien/Haus 24` Lortzingweg
- `.` Zu zahlen | search: type:invoice $pay:open | columns: name, amount, due | sort: due
- `.` Beträge | columns: name, type, amount
. is the whole archive; the path is in backticks. What was previously in
bookmarks.json and suchen.md is taken over at the first start.
Above the tree on the right there are two buttons: expand all (Ctrl +) and
collapse all except the path to the current folder (Ctrl -). A bookmark survives a
rename; if it still points into nothing, it stays struck through. A
drag onto a row moves there, a drag onto the empty area creates a
bookmark.
Toolbar#
On the right of the address bar, in groups: the indexer (pause, status, reindex), the trash, Show/Hide preview and Reload folder. Every button has a tooltip. The trash shows the number of entries, the indexer the number of files it still has to read — as a small gray badge as in the tab row: it counts, it doesn't warn (the trash cleans itself up after its period).
The indexer runs in the background, reads new files and checks every minute whether something has changed. It is the basis of the search and of the chat.
Keyboard#
The complete key assignments with focus areas, type-to-filter and the
Esc order are under Keyboard. F1 in the Documents tab
shows them as an overview, searchable; Ctrl+K opens the
command palette.